
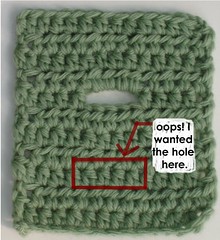
Wait, how did that buttonhole get there?
 What makes me chuckle the hardest is when another crocheter is amazed that us designers make mistakes. In my case, I am the best disaster crocheter out there. I make huge mistakes all the time. But the secret to my success is that I learned how to fix all sorts of odd problems so well, that most can't tell I made a mistake in the first place.
For instance, my latest problem: That even though I am an engineer, sometimes math just evades me. And the slot for a pocket ended up on the back of the sweater. Oops. My cousin who was helping me crochet it, who is the nicest friend ever to help me, was so cute- she really thought that I was going for some new kind of fashion statement where the pockets are on your shoulder blades. Uh, no. That's just because I can't add. So after laughing at myself for being a dunce. I went to work, crocheting up the hole and cutting a new one.
Hold on now, Robyn. You cut your crochet? Yup.
Here's how: I used red yarn to highlight what I was doing- you should use the same color yarn. Click picture to make it bigger.
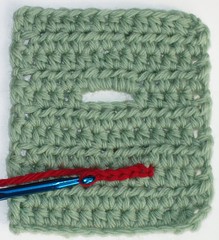
 Step one: Locate where you want your buttonhole or pocket to be. In my swatch, I'm showing that the hole is a few rows too high.
 Step two: Join a new yarn to the stitch right before where you want to start your hole. Make sure you are looking at the front of the stitch.
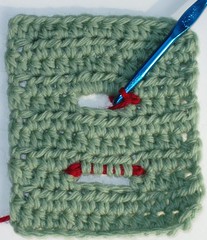
 Step three: Chain as many stitches as you need for your hole. In this case, I am chaining 4 to make a 4 stitch buttonhole.
Step four: Slip your last loop off the hook
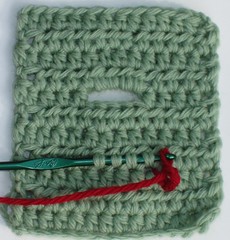 Step five: Using a smaller hook, insert hook (from left to right) into the bottom of ea stitch you want to go on your chain. In my case I want 4. Re-hook the last loop of the chain.
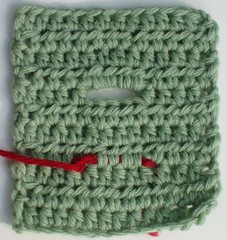 Step six: Pull loop through stitches. SL to the stitch at opposite end of the buttonhole. In this case its the fifth stitch from where I started. Fasten Off
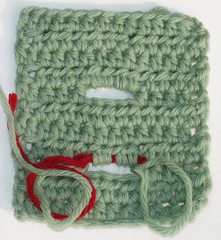 Step Seven: SCARY PART! Cut the middle stitch of the stitches under your chain, the ones you want to get rid off. Unwind the stitches to the ends of the buttonhole.
Step Eight: Fasten off yarn at either end. Weave in all your ends and you got yourself a new buttonhole!
Hey but what do I do about that hole up there?
 Step 1: Join new yarn to stitch at opening end of hole. Take loop off of hook.
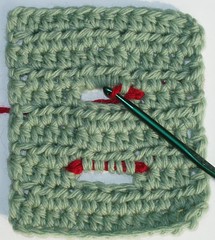 Step 2: Using a smaller hook, insert hook through the bottom of first stitch on chain, again left to right. Re-hook loop, pull loop through.
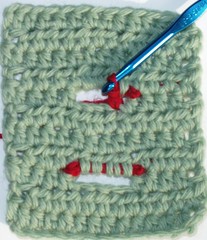 Step 3: Perform stitch as normal. In my case, I just did one hdc. Take last loop off of hook.
 Step 4: Using a smaller hook, insert hook through the bottom of the next stitch on the chain. Re-hook loop, pull loop through.
Repeat steps 3-4 to the opposite end of the hole.
 Step 5: SL working loop to stitch at the opposite end. Fasten Off.
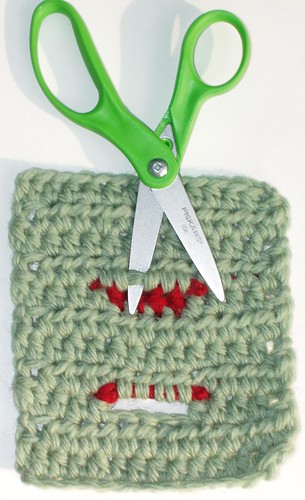 Step 6: Optional- Cut chain in the middle. Unwind yarn to the ends of the hole. (you can leave it there too- if its not that noticeable)
 Step 7: Fasten off, and weave in all ends.
TA-DA! You just moved your buttonhole. Pretty cool, right?


26 comments:
Pretty cool doesn't even cover it.
Thank you, Deneen! I kinda get excited when I get to fix something like this.
Wow.. that was impressive!
You're more brave than I, missy.
Amazing tutorial! I would have just started over. :) You rock!
Wow!!!
holy moly! that's awesome!
what a helpful tutorial! thanks for sharing.
Thanks for the tip!! I can assure you that I won't miss the occassion to use it (you see, I'm a disaster myself)
BRILLIANT! You absolutely amaze me - I would have ripped and recrocheted, unless, of course, I could change the mistake into a "design feature!"
Wow!!! Now how cool is that?!!
Excellent Tip and Tutorial! Thank you for sharing your wisdom!
Krystal
fuzzyferret.blogdrive.com
woah! You're magic!
I'd never have thought you could so seamlessly repair crochet! Everything matches up perfectly!
Thank you so much everyone! I hope you guys get as much use out of it as I do!
You're absolutely magic when it comes to fixing mistakes in crocheting. Keep them coming for all us mistake makers.
could you do something similar vertically? As in "steeking". I can find plenty online about steeking a knitted garment, but not a crocheted one. I'm actually making your "man's rugged vest" and have found, after being almost done, that it's too tight across my man's back. I would essentially have to start over completely unless I can steek down the middle of the back and graft in a narrow panel. Any advice?
Great question, Jo Ann! I don't know of a techinque to steek in crochet that will blend nicely. I know you can cut your crochet, add a anti-frizz solution to the edge, then single crochet up the edge (making sure to grab at least one stitch in from the edge), and that will stay. But it will be notice-able as an edge. I am not sure how to blend it in as a pattern stitch.
This is the best description of how to fix a crochet mistake that I have ever seen!!!!!
Simply FANTASTIC!!
Marly
Robyn. You are amazing.
Nice!
Astitchisastitch/blogspot.com
So cool, I would have cussed and torn out the whole thing. Thanks.
That is one of the best tutorials I've seen for fixing a problem like this! Thanks!
You are a crochet GENIUS!
I am amazed...and so glad you shared!
Just found this via pinterest and I am AMAZED! Thank you so much for this, it will save me tons of frogging in the future I am sure.
This was so amazing. It is so helpful, but I would like a photo of where you cut the piece.
OMG just purchased one of your books and just wanted to say your help & guidance is still powerfully relevant in 2021🌷 thank you!!! Just when you think you know all there is to know after nearly 3 decades of crocheting. Bless you and be safe in these COVID times🌸
Post a Comment